By Prajna Shetty, SDE at Yahoo Developer Network
Flurry Analytics provides you the tools and resources you need to gain a deep level of understanding about your users’ behavior in your apps. In this blog post, we’ll walk you through how to build a Nearby Photo Discovery Android Application and how you can instrument it with Flurry Analytics. We’ll cover:
- Building core features of Nearby Photo Discovery app
- Flurry Analytics basic instrumentation for Sessions, DAUs, Installs, etc.
- Custom events
- Instrumenting user location, tracking errors and crash reporting!
Download code for this tutorial
Building core features of Nearby Photo Discovery app
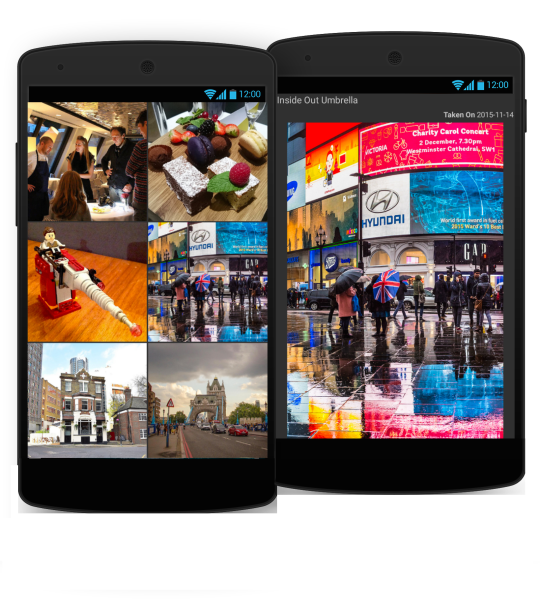
The Nearby Photo Discovery Android App picks up the user’s location and shows the user a grid view of all public Flickr images taken within a 5km radius of that location, sorted by decreasing “interestingness”. On clicking an image, the app displays a full screen view of that image, along with image details like owner and date taken.
Core features of the Nearby photo discovery app can be built by following the steps below :
- First create a PhotoFeedActivity. Use a RecyclerView with a GridLayoutManager to display the feed of images.
- Use open source libraries like Android AsyncHTTPClient to make asynchronous calls to the Flickr APIs and Picasso for remote image loading.
- Define an adapter class that provides binding between the data and the views.
- Setup click listeners for the images, so that on clicking an image, you get directed to the PhotoDetailActivity screen, which shows the image selected along with image details like title, owner, etc.
Flurry Analytics basic instrumentation
The steps you should follow to integrate Flurry Analytics :
- Sign up or log in to Flurry. Create an app for Android. Download the SDK (FlurryAnalytics_x.y.z.jar) and get your API key.
- Add FlurryAnalytics_x.y.z.jar to your project’s libs folder.
- Add Google Play Services library. If selectively compiling individual Google Play Service APIs, you should include the Google Analytics API.
- Configure your AndroidManifest.xml as shown in the code.
- Add a call to
FlurryAgent.init(this, FLURRY_APIKEY)in the Application (FlurryAnalyticsSampleAndroidApp) class. Since theminSdkVersionof this app is set to API level 15, session handling is completely automatic. Hence, no calls toFlurryAgent.onStartSession(Context)andFlurryAgent.onEndSession(Context)are required.
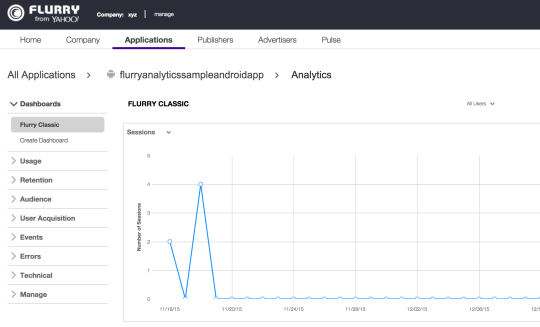
Integrating Flurry Analytics into your app will give you metrics like unique users, session length, frequency of use, etc. These metrics related to your app usage will show up on the Flurry dashboard when you log into it.
Here you are done with the basic setup. Now that you have completed the basic setup, you can add Custom Events and other Advanced Features of Flurry.
First create a wrapper class called AnalyticsHelper that helps with logging custom events, errors and other metrics to Flurry.
Custom Events
You can create custom events that can help you understand the user behavior better :
1. EVENT_FETCH_PHOTOS - This is a timed event that is logged whenever the user logs into the application and the image feed is fetched. This requires two api calls. Also, the third argument to the AnalyticsHelper.logEvent call should be true.
AnalyticsHelper.logEvent(AnalyticsHelper.EVENT_FETCH_PHOTOS, fetchPhotosEventParams,true ); calls FlurryAgent.logEvent(eventName, eventParams, timed);
AnalyticsHelper.endTimedEvent(AnalyticsHelper.EVENT_FETCH_PHOTOS); calls FlurryAgent.endTimedEvent(eventName, eventParams);
You can also capture certain event parameters. Do this by passing a HashMap like fetchPhotosEventParams parameter to this call. This param contains information about the location for which the api call is being made. On success of the api call, you should call AnalyticsHelper.endTimedEvent. These calls will send to Flurry the time taken by this event.
2. EVENT_PHOTO_SELECTED - This is not a timed event. This event is logged whenever the user selects an image from the image feed. The event parameter itemClickEventParams contains details about the selected image like photo id and photo secret. Events like these can help you gauge user’s behavior, like in this case you can find out what images are popular with the users. Also, since this is not a timed event, the third argument to the api call should be false.
AnalyticsHelper.logEvent(AnalyticsHelper.EVENT_PHOTO_SELECTED, itemClickEventParams, false);
3. EVENT_FETCH_PHOTO_STATS - This is a timed event similar to the first event. This event will be called whenever the call to Flickr api - flickr.photos.getInfo is made.
AnalyticsHelper.logEvent(AnalyticsHelper.EVENT_FETCH_PHOTO_STATS, fetchPhotoStatEventParams, true );
The dashboard below shows the metrics related to these events.

Instrumenting user location, tracking errors, page views
You can also leverage certain advanced features of Flurry
1. Track geographic location - This call manually sets the location, if your app uses GPS.
AnalyticsHelper.logLocation(lastLocation.getLatitude(), lastLocation.getLongitude()); calls FlurryAgent.setLocation(float latitude, float longitude);
2. Track errors - A call to this api can be made multiple times across the app, so that you can easily track errors and crashes happening in each instance of your app. Flurry will report the first 10 errors to occur in each session.
AnalyticsHelper.logError(LOG_TAG, "Location Settings Disabled. Resolution Intent Exception", e); calls FlurryAgent.onError(errorId, errorDescription, throwable);
The FlurryAgent will also notify you of uncaught exceptions. The feature is enabled by default, and if you would like to disable this behavior, the below call must be made before calling init.
FlurryAgent.setCaptureUncaughtExceptions(false);
3. Track page views - This method is used to report page view count. To increment the total count, this method is called whenever a new page is shown to the user.
AnalyticsHelper.logPageViews(); calls FlurryAgent.onPageView();
4. Set version name - This method sets the version name of the app. This name will appear in the http://dev.flurry.com as a filtering option by version. This is called before init.
FlurryAgent.setVersionName("1.0");
5. Set log level - This method sets the log level of the internal Flurry SDK logging. Valid inputs are Log.VERBOSE, Log.WARN etc. Default log level is Log.WARN. This is called before init.
FlurryAgent.setLogLevel(Log.VERBOSE);
Besides the Flurry features discussed above, there are some more features that you can use in your app, to get more metrics about your app usage. For example, if your app collects information about the user, you can use the Flurry features that help track demographics.
FlurryAgent.setUserId(SHA256userID) - Use this to log the user’s assigned ID or username in your system. This should be called before init, if possible.
FlurryAgent.setAge(22) - Use this to log the user’s age. Valid inputs are between 1 and 109. This should be called before init, if possible.
FlurryAgent.setGender(FlurryGender.FEMALE) - Use this to log the user’s gender. Valid inputs are Constants.MALE or Constants.FEMALE. This should be called before init, if possible.
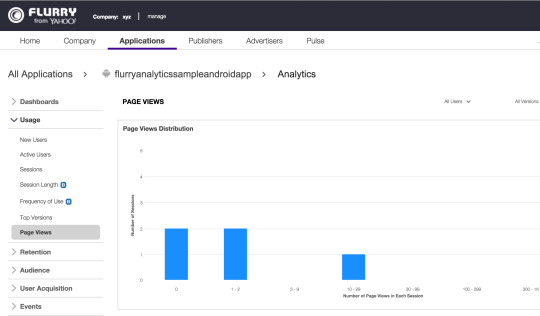
The screen grab of the Flurry dashboard below shows page view related metrics for this app.
Flurry Analytics is extremely powerful and if fully leveraged can help you optimize your app experience. If you would like to know more about using Flurry Analytics in your app, check out Flurry Documentation here.